Getting started with – Azure Site Recovery

<updated 14th march 2017>

gettingstarted-asr

In this series of “Getting Started” articles, I will post the most up-to-date information I use with Microsoft Partners and customers when enabling them with Azure infrastructure services. I follows the same structure which is: getting started, training videos if available, then reference architectures, capacity planning and pricing information.

Disaster Recovery Plans aka DRP is one the most ungrateful work in IT. Because basically you are going to prepare for some situations that will be painful and difficult. However, this is a good exercise to protect against one of the most prevalent laws in IT: “Anything (Everything) will fail at some point, and very likely at the worst time”.

It puts you in a state of mind that most of people don’t like.and you will ask your boss money for something that you hope will never be used.

That’s where the cloud can help, for both virtualized and non virtualized workloads. Here’s how in 4 easy steps:

  1. First step consists of replicating your production workloads as they are running.
  2. Second step is to automating the disaster recovery plan execution.
  3. Run the workloads in Azure.
  4. Replicate your virtual machines back to your datacenter.

Overview video

https://www.youtube.com/watch?v=eOOwMQPBKfM

Overview article

https://azure.microsoft.com/en-us/documentation/articles/site-recovery-overview/

Training Videos

https://channel9.msdn.com/Series/Azure-Site-Recovery

Technical References

Azure Site Recovery support matrix – https://docs.microsoft.com/en-us/azure/site-recovery/site-recovery-support-matrix

Prepare for Azure Site Recovery deployment – https://docs.microsoft.com/en-us/azure/site-recovery/site-recovery-best-practices

Migrate AWS workloads to Azure – https://docs.microsoft.com/en-us/azure/site-recovery/site-recovery-migrate-aws-to-azure

Architecture references

VMware and Physical Servers to Azure – https://docs.microsoft.com/en-us/azure/site-recovery/site-recovery-vmware-to-azure

Hyper-V to Azure – https://docs.microsoft.com/en-us/azure/site-recovery/site-recovery-hyper-v-site-to-azure

VMM to Azure – https://docs.microsoft.com/en-us/azure/site-recovery/site-recovery-vmm-to-azure

Network planning for disaster recovery: https://docs.microsoft.com/en-us/azure/site-recovery/site-recovery-network-design

Workload guidance

What workloads can you protect with Azure Site Recovery? – https://docs.microsoft.com/en-us/azure/site-recovery/site-recovery-workload

Active directory and DNS

SQL Server

Sharepoint

Dynamics AX

Exchange

SAP

Running automation in ASR – https://docs.microsoft.com/en-us/azure/site-recovery/site-recovery-runbook-automation 

Sizing & capacity planning

Capacity planning: https://docs.microsoft.com/en-us/azure/site-recovery/site-recovery-capacity-planner

Azure Site Recovery Deployment Planner: https://aka.ms/asr-deployment-planner-doc 

Pricing reference

https://azure.microsoft.com/en-us/pricing/details/site-recovery/

Service updates information

https://azure.microsoft.com/en-us/updates/?product=site-recovery

When you have put the infrastructure in place and are in the process of fully automating the disaster recovery plan, you need skills on Azure Automation. There’s a pretty nice course on Microsoft OpenEDX: https://openedx.microsoft.com/courses/course-v1:Microsoft+AZURE210x+2016_T4/about 

Feel free to connect with me and provide feedbacks!

Arnaud

My Azure IaaS Toolbox

<last update 10/09/2017>

As I help customers and partners to build VM and various infrastructure services on Azure, I started to accumulate a lot of tools to make life easier. Here is my list, feel free to comment and share yours, I’d be happy to learn about new ones!


Storage

Tool Platforms Notes
Azure Storage Explorer (Microsoft) Linux, Windows, Mac Nice UI to manipulate storage in Azure.
AzCopy (Microsoft) Windows Command line context to upload/download storage content.
Azure Explorer (Red Gate) Windows GUI free tool from Red-Gate to explore Azure storage.
CloudXplorer (Clumsyleaf) Windows Classical tool from Clumsyleaf.
Trucks Because sometimes it’s just too big, send your disks to Azure and we import it for you.
Azure Data Box We will ship you a box, you fill it and we put it on your Azure account for you.


Networking

Tool Platforms Notes
http://www.azurespeed.com/ Tests the speed of Azure Services from your IP location to the rest of the world.
Message Analyzer Windows Network traces and so much more.
Network Monitor (netmon) or WireShark Windows, Mac Netmon 3.4 still works on Windows 10, as an alternative to WireShark.
Fiddler (Telerik) Mac, Windows, Linux, etc. Web debbuging proxy for fun and profit.
tnc (PowerShell) Windows 8.1 Tnc is a tool built-in Windows 8.1 and later, allows you to test network connectivity and latency on various ports.
PortQryUI Windows TCP and UDP Port Query fairly old tool, preset with common Windows Ports and services.


Compute

Tool Platforms Notes
Remote Desktop Connection Manager Windows Classical multi windows RDP client.
MobaXterm Windows Multi windows SSH client combined with SCP capabilities.
Virtual Machine Readiness assessment Windows Toolset used to evaluate a VM’s readiness for Azure. Gives you a detailed report of the machine state.
Certification Test tool for Azure Certified Windows This tool allows you to self-assess your VM configuration against Azure best practices for certification (prerequisite for the Marketplace).
Virtual Machine Manager (VMM) Plugin Windows Allows you to manage your Azure resources from VMM.


General Automation

Tool Platforms Notes
PowerShell Windows Direct MSI Setup, avoiding the infamous WebPI. Script center to find examples: Browse script center
Cross platform CLI Linux, Mac, Windows The cross platform command line interface for Azure.


Documenting platforms

Tool Notes
http://armviz.io/ Visualize a JSON template graphically
http://www.azuredockit.com/ Generate a documentation or diagram of a deployment
Azure, Cloud and Enterprise Symbols, Icon Set – Visio stencil, PowerPoint, PNG, SVG Complete Visio and PNG illustration to document your Azure deployments
Reference Architectures Link to reference architecture and cloud design patterns
Visio File for Reference Architectures Mandatory for all cloud architects!
Architecture blueprints Architecture diagrams and blueprints for various services, can copy/paste the SVG resources from the webpage.


Azure Templates Authoring

Tool Platforms Notes
Visual Studio Code Mac, Linux, Windows Very nice tool to edit JSON templates for Azure and Azure Stack.
Visual Studio Windows Complete IDE for your application, includes a comprehensive support to edit and consume Azure resources directly.
Azure SDK Installation Mac, Linux, Windows, etc. Contains installers for all platforms.
https://github.com/Azure/azure-quickstart-templates Templates and quick starters for JSON templates.
Git Desktop Mac, Windows Allows to sync your Github repos on your laptop.
https://resources.azure.com/ Allows you to query API in JSON format “graphically”.
Azure Container Services Engine Mac, Windows, Linux ACSEngine helps you build ARM templates for your clustered Docker deployments.


Hope this was useful, please comment and have fun on Azure!

Arnaud

Preparation guide for 70-743 – Upgrading Your Skills to MCSA: Windows Server 2016

blogtw

If you are MCSA certified on Windows Server 2012 or Windows Server 2008, you might want to upgrade your certification to Windows Server 2016. Fortunately you don’t have to go through the whole curriculum again and can just upgrade to MCSA Windows Server 2016 with one exam.

As an upgrade certification, 70-473 mainly verifies that you know the new features and differences compared to Windows Server 2012, so a very nice starting point is to review all the “What’s new in Windows Server 2016” sections for the different technologies and study their prerequisites, deployments methods and management techniques. The outline of this certification is located here: https://www.microsoft.com/en-us/learning/exam-70-743.aspx

Generally speaking the Windows Server 2016 docs center is a wealth of information and you can access it here: https://technet.microsoft.com/windows-server-docs/get-started/Windows-Server-2016

Below is my list of links mapping to the different exam categories. This list is here to help you review before going to the exam, but of course is not sufficient to pass and you will need some hands-on experience to succeed.


Install Windows Servers in host and compute environments

There has been some significant improvements in the toolset you use to manage Windows, including a whole set of commands to manage the new DIY edition of Windows: Nano Server. In this area we check your basic knowledge of DSC to manage configurations of Windows, and let me remind you that you cannot anymore switch from graphical to core editions of Windows and vice/versa. Very importantly we want to make sure you know how to service images online or offline.

General changes related to installation and management are documented here – https://technet.microsoft.com/en-us/windows-server-docs/management/management-and-automation

Install, upgrade, and migrate servers and workloads

Install and configure Nano Server

Create, manage, and maintain images for deployment


Implement storage solutions

In this section we verify that you know how to configure a resilient storage infrastructure including support for DCB, Multipath IO and SMB 3.0. We verify that you know the scenarios and mechanisms for Storage replica server to server, cluster-to-cluster and in stretch cluster topology.

General changes related to storage are documented here: What’s new in storage in Windows Server 2016 – https://technet.microsoft.com/en-us/windows-server-docs/storage/whats-new-in-storage

Implement Server Storage

Implement Data Deduplication


Implement Hyper-V

Hyper-V has evolved and now allows nested virtualization, secure boot with Linux VM, and PowerShell direct. Production checkpoints allows to do VM “snapshots” that are using VSS providers so that you can use that as a valid “backup”. Shielded VM (preventing the fabric administrator to access the VM data and to run the VM in another fabric.) are also a topic to work before you go to the exam.

All the details are here: What’s new on Hyper-V on Windows Server 2016 – https://technet.microsoft.com/en-us/windows-server-docs/compute/hyper-v/what-s-new-in-hyper-v-on-windows

Install and configure Hyper-V

Configure virtual machine (VM) settings

Configure Hyper-V storage

Configure Hyper-V networking


Implement Windows containers

Containers is a new way to deploy and manage applications in Windows. You can deploy and manage containers using Docker on Windows as on Linux.

Windows Containers Documentation – https://msdn.microsoft.com/virtualization/windowscontainers/containers_welcome

Deploy Windows containers

Manage Windows containers


Implement high availability

Just to name a few important features to work on: Cluster Operating System Rolling Upgrade, Storage Replica and cloud witness

What’s new in Failover Clustering in Windows Server 2016 – https://technet.microsoft.com/en-us/windows-server-docs/failover-clustering/whats-new-in-failover-clustering

Implement high availability and disaster recovery options in Hyper-V

Implement failover clustering

Implement Storage Spaces Direct

Manage failover clustering

Manage VM movement in clustered nodes


Implement Domain Name System (DNS)

The DNS service in Windows Server 2016 implements a couple of new features like policies which allows you to send different results to client request based on criteria like subnets or hour of the day. It allows also to query IPv6 root hints by default and has a request pacer to limit request-intensive clients.

What’s new in DNS in Windows Server 2016 – https://technet.microsoft.com/en-us/windows-server-docs/networking/dns/what-s-new-in-dns-server

Install and configure DNS servers


Implement IP Address Management (IPAM)

Windows IPAM has new scenarios and integrated management possibilities. It will basically allows you to manage more efficiently your DNS and DHCP infrastructure without having the need to logon to the different consoles and granting you a better view on the whole infrastructure, physical or virtualized with VMM.

What’s new in IPAM – https://technet.microsoft.com/en-us/windows-server-docs/networking/technologies/ipam/what-s-new-in-ipam

Install and configure IPAM

Manage DNS and DHCP using IPAM


Implement network connectivity and remote access solutions

DirectAcccess had no major evolution in Windows Server 2016, so you can rely on your Windows Server 2012 R2 knowledge. Most of the new features are related to SDN multi-tenant gateway implementation and BGP support.

Implement virtual private network (VPN) and DirectAccess solutions


Implement an advanced network infrastructure

In this section, we evaluate your knowledge of the new SDN architecture of Windows Server 2016. It now has a real SDN controller which is acting as a central point to manage and deploy network definitions and policies via software calls.

Windows Server 2016 Supported Networking Scenarios – https://technet.microsoft.com/en-us/windows-server-docs/networking/windows-server-2016-supported-networking-scenarios

Implement high performance network solutions

Determine scenarios and requirements for implementing software-defined networking (SDN)


Install and configure Active Directory Domain Services (AD DS)

AD has new features mainly related to Azure AD integration, better security and Just in Time Admin concepts. For the exam, we will also check that you know how to administer replication topology and FSMO roles operations in PowerShell.

What’s new in Active Directory Domain Services for Windows Server 2016 – https://technet.microsoft.com/en-us/windows-server-docs/identity/whats-new-active-directory-domain-services

Install and configure domain controllers

Implement identity federation and access solutions

In this section, we exam the new features and mostly evaluate your PowerShell skills as most of the configuration happens here in scripting.

Install and configure Active Directory Federation Services (AD FS)

Implement Web Application Proxy (WAP)


Good luck for the exam! Would be happy to hear if that helped you pass!

Arnaud

Virtualized Services Directory on Hyper-V for Windows Server 2012 R2 – part 2

In the previous article of this serie, we deployed an empty VM to host our VSD server, in this second part, we are getting serious and deploy the Linux OS and the VSD server role!

Proceed to CentOS 6.7 Installation

We will proceed to default minimal install of Centos 6.7:

1. Double click on the Contoso – VSD VM and click the Power Button to start it.
2. Start the setup of CentOS:centos2_thumb[2]
3. Proceed to setup choosing the desired keyboard, then select “Basic Storage Device” and “Yes, Discard Any Data”

Type the hostname for this machine “vsd.contoso.local” and the desired timezone.

Select the root password and Use All Space, Write Changes to Disk.

Click Done and Begin Installation.

4. Once the setup is finished, restart the virtual machine and log in to do basic networking setup:

dhclient eth0

In order to edit my configuration files, I don’t like vi and I prefer nano, so I get it online.

sudo yum install nano –y

Edit the file Ethernet NIC settings to match your network:

nano /etc/sysconfig/network-scripts/ifcfg-eth0

DEVICE=”eth0″

NM_CONTROLLED=”no”

ONBOOT=”yes”

TYPE=”Ethernet”

BOOTPROTO=”static”

IPADDR=192.168.0.95

GATEWAY=192.168.0.1

NETMASK=255.255.255.0

Then verify the network name:

nano /etc/sysconfig/network

NETWORKING=yes

HOSTNAME=vsd.contoso.local

Add the server IP address to the host file:

nano /etc/hosts

192.168.0.95 vsd.contoso.local

Restart networking:

nano service network restart

Check your hostname settings with the following command:

hostname -f

5. Install and configure NTP service:

sudo yum install ntp -y

sudo nano /etc/ntp.conf

Modify the ntp.conf to have the internal server:

nano /etc/ntp.conf

server 192.168.0.211

We choose to use a local NTP server in our environment with IP address 192.168.0.211. Please note that Microsoft Active Directory provides a NTP server feature, however, we are not able to use it as a time source for VSD, so we use an alternate NTP Server.

Save the file and restart the NTP client:

sudo service ntpd restart

Set the ntpd service to start automatically:

sudo chkconfig ntpd on

Verify that host is synchronized by using the following command:

ntpstat

centos3_thumb[2]

6. We will pin our distribution to CentOS 6.7 repository in order to avoid it to be upgraded to later builds.

We create a new file with repo information:

sudo nano /etc/yum.repos.d/c67.repo

[c67]

name=CentOS67

enabled=1

gpgcheck=0

baseurl=http://vault.centos.org/6.7/os/x86_64/

7. Install dependencies

sudo yum install openssh-clients libedit bind-utils -y

Linux Integration Services Update

Microsoft regularly updates Kernel driver and user mode components in order to make Linux work best and add new supported features. We need to install Linux Integrated Services (LIS) in order to ensure best behavior.

1. Open a SSH session to the newly configured machine, in this guide, we use MobaXTerm:

lis1_thumb[3]

2. Download LIS 4.1.2 components from Microsoft Website with the following command:

sudo yum install wget -y

wget https://download.microsoft.com/download/7/6/B/76BE7A6E-E39F-436C-9353-F4B44EF966E9/lis-rpms-4.1.2-1.tar.gz

3. Extract the files using the following command:

tar -xvzf lis-rpms-4.1.2-1.tar.gz

4. Update the components using:

cd LISISO/

sudo ./upgrade.sh

lis2_thumb[2]

5. Once the setup is finished, restart the virtual machine and log back in.

Deploying the VSD Components on the VM

In this section, we will copy the VSD installation binaries to the VSD VM and proceed to setup.

1. Extract the “Nuage-VSD-*-ISO.tar.gz” file that you have downloaded. Get the .ISO file and go to Hyper-V manager and mount it to the “CONTOSO-VSD” VM.
2. Mount the ISO file on your system:

sudo mkdir /media/cdrom

sudo mount /dev/sr0 /media/cdrom

3. Launch VSD Setup process:

cd /media/cdrom

sudo ./install.sh

vsd3_thumb[3]

Select standalone option by hitting s and confirm with yes.

vsd4_thumb[1]

4. Wait for the install to finish, note that it can take several minutes.

Once the setup is finished, you can check that all the components are active using the following command:

monit summary

This should display you the following output for a fully ready environment:

vsd5_thumb[2]

Verify that VSD is operational

Once the setup has completed, you can verify the configuration and log in the portal for the first time. After reviewing operations, you will be able to install a product key to start using licensed features of your VSD.

1. Open your favorite browser and enter the URL:

https://192.168.0.95:8443

Add exception to your browser as this is expected for a first configuration running with self-signed certificate

vsd6_thumb[2]

2. Login with the default credentials:

vsd7_thumb[2]

3. Welcome to the world of VSD!

vsdui.png

So that you have VSD installed, you can start playing and creating organizations, networks, network policies.

But in order to have it enforced somewhere, you need a network controller. Monitor this blog and we will review the steps to make Nuage Networks controller run on Hyper-V!

For more information:

You can also reach me at my email if you need more info and trial: [first].[last]@nuagenetworks.net!

Arnaud

Virtualized Services Directory on Hyper-V for Windows Server 2012 R2 – part 1

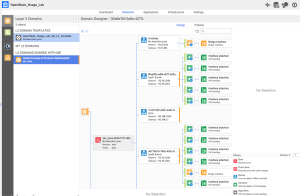
In Nuage Networks solutions family (see previous post for a quick intro), Virtualized Services Directory is the foundation for enterprise-class SDN. VSD serves as a policy, business logic and analytics engine for the network services.

VSD includes the architect role, a HTML5-based UI that allows operations to occur in a user-friendly way. It also comes with a command line interface and every single operation can also be done by REST API calls.

VSD contains a multi-tenanted service directory that supports role-based administration of users, compute and network resources. It also manages network resource assignments such as IP and MAC addresses.

For the purpose of network service assurance, the VSD allows the definition of statistics rules such as collection frequencies, rolling averages and samples, as well as Threshold Crossing Alerts. When a TCA occurs, it will trigger an event that can be exported to external systems through a generic messaging bus. Statistics are aggregated over hours, days and months and stored in an analytics cluster to facilitate data mining and performance reporting.


VSD Supported Configurations

VSD supported configurations are detailed here, but in a nutshell, VSD is composed of two roles:

  • VSD Server itself
  • VSD Statistics server (can be a Hadoop or Elastic Search storage)

In this post, I will focus on VSD Server itself.

The VSD can be deployed stand-alone for testing and validation environments, and will be deployed in clusters for production environments in order to achieve high-availability and scaling needs.

As a customer, Nuage Networks provides you with the following form factors for VSD server deployment:

  • VMware Image: supported on ESXi 5.5/6.0
  • QCOW Image: supported on KVM for CentOS 6.X, RHEL 6.X/7.X
  • ISO file for your own setup.

The ISO files allows it to be deployed on a physical server running: CentOS and RHEL versions 6.5, 6.6 and 6.7 with minimal install.


Objectives of this setup

So there is no reference to Hyper-V in the supported platforms list, but it was too tempting for me not to test it’s installation and running.

Warning! This post does not depict any current Nuage Networks best practice nor supported configuration for hosting VSD platform.

I will provide here some platform-level recommendations to make VSD usable for some small demo/POC environments where you want the platform to be usable and stable.

We will deploy a VSD role on a Hyper-V host name CLOUDHOST, which is running Windows Server 2012 R2. This host has an external virtual switch called “Management” which is linked to the datacenter world and has connectivity to the Internet.

image


Prerequisites for this setup

In order to start with this setup, you should have the following elements available:

  • A running Windows Server 2012 R2 host machine with Hyper-V role, management console and PowerShell enabled.
  • Latest VSD binaries from Nokia Online Support Center.
  • CentOS 6.7 ISO Minimal Install Setup files.
  • SSH Client: Anything like Putty, I personally like MobaXterm.
  • A NTP server.
  • The VSD VM will need internet connectivity to download various components during the setup process.


VSD VM Recommendations for Hyper-V

The first step consists of creating a Hyper-V Virtual Machine with CentOS 6.7 binaries installed. The specifics recommended parameters (Recommended by me, not officially Nuage Networks!) for this VM are:

Configuration item   Recommended value
VM Generation
  • Generation 1
RAM
  • 8192 GB (bare minimum)
  • NO dynamic memory used
Processor
  • 4 vCPU or more
Disk type and Size
  • Use VHDX format
  • Dynamic Size (127 GB by default)
NIC Configuration
  • 1 VNIC for management
  • Use Synthetic NIC and not the emulated (legacy)
Integration services
  • NOT using the Time Synchronization option
  • Stop action: Shutdown the guest operating system

VM Creation

In Windows Server 2012 R2 UI, the following steps need to be completed:

1. Open the Hyper-V management console. In the Server Manager, select Hyper-V, right click on the computer name and select Hyper-V Manager.
2. On the right side on the management console, select New then Virtual Machine

hv1

3. On the New Virtual Machine Wizard, click Next
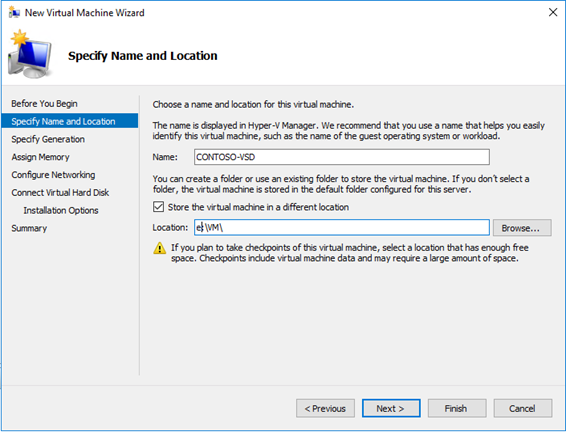
4. Type a name for the Virtual Machine you created: CONTOSO-VSDhv2
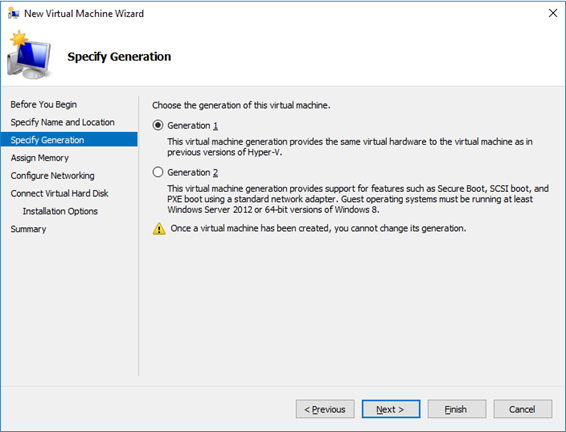
5. Create a Generation 1 virtual machine:hv3
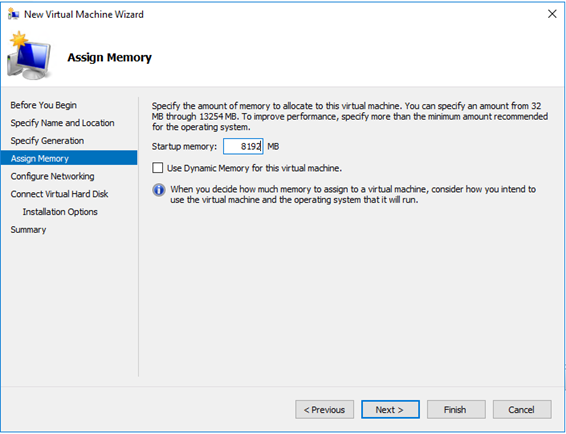
6. Specify 8192MB of RAM, verify that the checkbox “Use dynamic memory” is NOT enabled.hv4
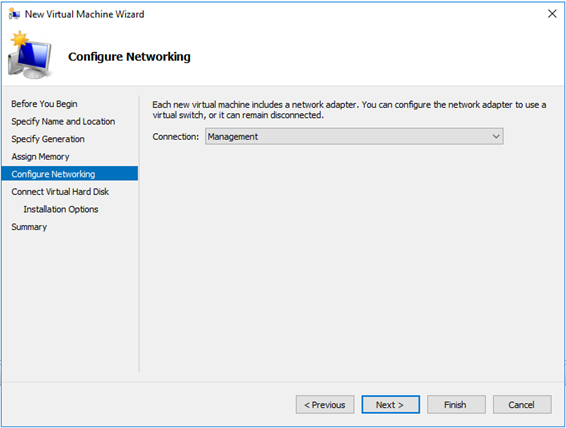
7. Connect the virtual machine to the Management network Interface or any suitable virtual switch for your environment. hv5
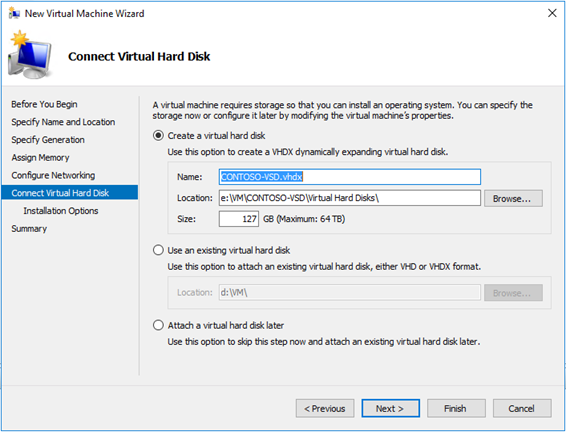
8. Create the virtual hard disk file on the desired path:hv6
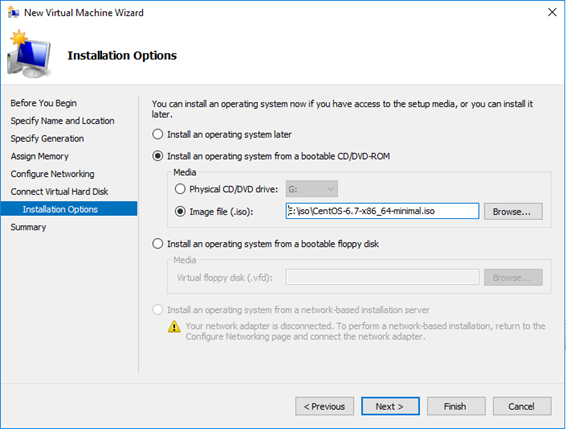
9. Specify “Install an operating system from a bootable CD/DVD-ROM” and select the location of your CentOS 6.7 installation media hv7
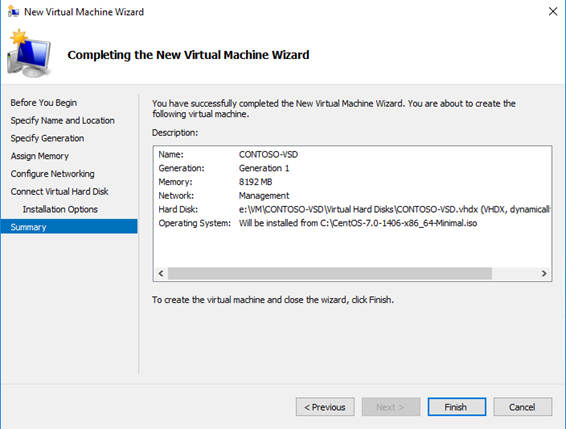
10. Review the parameters and click Finish: hv8

Do not start the VM, we need to modify additional settings.

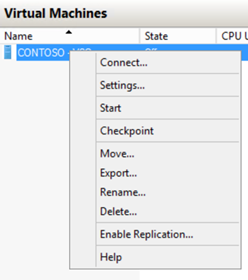
11. Once the VM has been created, right click on it and select Settingshv9
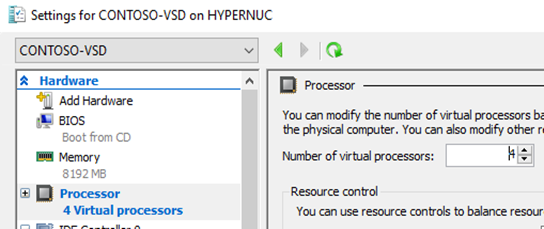
12. In the processor section, add cores to have at least 4 virtual CPUhv10
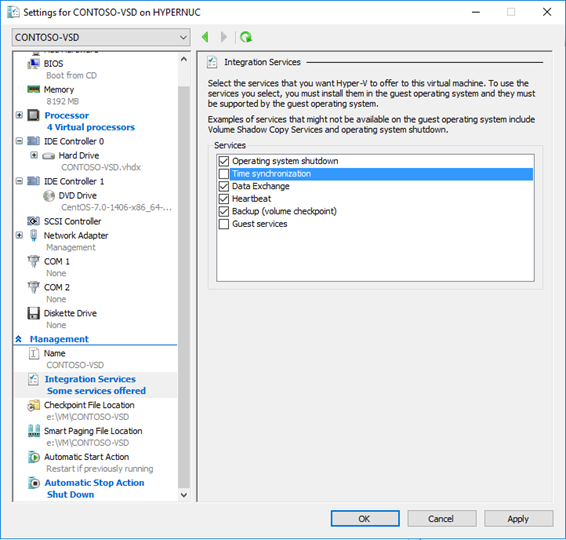
13. Go to the Integration Services section of the Virtual Machine and

  • Uncheck the “Time Synchronization” item as we will use the NTP service to have consistent time-stamps with the whole Nuage Architecture
  • In the Automatic Stop Action, select “Shutdown the guest operating system”. hv11
14. Click OK to confirm the VM settings.

VM Creation: PowerShell

If you prefer to use PowerShell, you can do the previous steps in just a couple of lines where I define the following variables:

  • vmpath and vhdpath as the paths for the VM and the virtual hard disk file to be created.
  • vmname as the name of the VM.
  • vmswitchname as the name of the hyper-v virtual switch where this VM will be attached.
  • Linuxisopath with the path to the CentOS 6.7 minimal install ISO.

$vmpath=”C:\VM\CONTOSOVSD”
$vhdpath=”C:\VM\CONTOSOVSD\contoso2.vhdx”
$vmname=”CONTOSO-VSD2″
$vswitchname=”Management”
$linuxisopath=”E:\iso\CentOS-6.7-x86_64-minimal.iso”

New-VM -NewVHDPath $vhdpath -NewVHDSizeBytes 127GB -Generation 1 -MemoryStartupBytes 8GB -Name $vmname -Path $vmpath -SwitchName $vswitchname
Set-VM -Name $vmname -ProcessorCount 4 -AutomaticStopAction ShutDown
Get-VMIntegrationService -VMName $vmname -Name “Time Synchronization” | Disable-VMIntegrationService
Set-VMDvdDrive -VMName $vmname -Path $linuxisopath
Start-VM -Name $vmname


This is quick so in many times, I prefer PowerShell!

That was easy! This is it for this first part of this post, in the second part, we will proceed to Linux CentOS 6.7 setup with the prerequisites for VSD and proceed to VSD server setup!

For more information in the meantime:

Arnaud